The assignment will be graded out of 100 points. Submit a file called answers.xxx (where you replace xxx with whatever extension is appropriate, depending on the file format you use), that contains contains answers for all tasks. Acceptable file formats are plain text, Word document, OpenOffice document, and PDF. Put your name and UTA ID on the first line of the document.
Submit your answers.xxx file to Blackboard before the deadline. You will be able to revise your answers until the deadline with no penalty.
Design an expanding opcode scheme to allow all the following to be encoded in a 32-bit instruction:
A certain machine has 16-bit instructions and 6-bit addresses. Some instructions have one address and others have two. If there are N two-address instructions, what is the maximum number of one-address instructions?
(This is Problem 5 from Chapter 5 of the textbook).
Is it possible to design an expanding opcode scheme to allow the following to be encoded in a 12-bit instruction? A register address takes 3 bits to specify.
Consider the machine whose instruction formats are given in Fig. 5-24. What is the maximum possible number of registers that that machine can have? Assume that DEST, SRC1, and SRC2 have enough bits to refer to any existing register.
One of your friends has just come bursting into your room at 3 AM, out of breath, to tell you about his brilliant new idea: an instruction with two opcodes. Should you send your friend off to the patent office or back to the drawing board? In other words, is your friend's idea useful or useless? Justify your answer
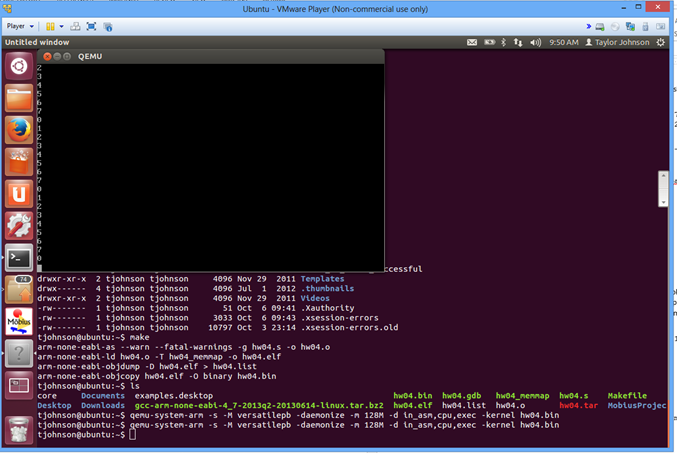
This task is to introduce you to the Quick Emulator (QEMU) and ARM assembly programming. The task is to take a screenshot of a running QEMU example, then include this screenshot as a picture in your answers.xxx document. Your name must be visible on the screenshot (type it somewhere visibly if your username does not display). An example screenshot is shown below. If your name is not visible, you will not receive credit. If the output of the program is not visible, you will not receive credit.
Install Virtual Box (free) from this link: http://www.oracle.com/technetwork/server-storage/virtualbox/downloads/index.html.
Step 2. Download and installation images for 32-bit Ubuntu.
Download an ISO for 32-bit Ubuntu for free from here: http://www.ubuntu.com/download/desktop.
Ubuntu 12.04 LTS.
ubuntu-12.04.4-desktop-i386.iso. When it finishes downloading, move that file to a place that you will remember (for example, your desktop). We will be referring to this file as the Ubuntu installation image.
Step 3. Create a virtual 32-bit Ubuntu machine in Virtual Box.
After completing the previous step, you should now see some machine information displayed on the screen, and on the left you should see text that says "Powered Off".
ubuntu-12.04.4-desktop-i386.iso), and select that file.
Step 5. Install Guest additions.
Guest additions is an add-on that needs to be installed so that you are able to copy and paste between your actual computer and the virtual machine. To install it, follow these steps:
Step 6. Start a terminal.
From the buttons on the left side of the screen, select the top one, that is called "Dash home". That button is a white circle (with some shapes in it) in brownish background.
Type "terminal" in the search box. Double-click on the terminal icon that comes up.
Once you have a terminal window open, execute the following commands from the command line. Be careful about line breaks.
Step 7. Install the QEMU system.
Execute this on the command line:
sudo apt-get install qemu qemu-system qemu-user qemu-utilsStep 8. Install the GCC compiler tools for ARM processors.
We need a special version of GCC since we are not compiling for an x86/x86-64 architecture. Execute these commands:
wget https://launchpad.net/gcc-arm-embedded/4.7/4.7-2013-q3-update/+download/gcc-arm-none-eabi-4_7-2013q3-20130916-linux.tar.bz2

tar xjvf gcc-arm-none-eabi-4_7-2013q3-20130916-linux.tar.bz2

sudo mv gcc-arm-none-eabi-4_7-2013q3 /opt/ARM

echo "PATH=$PATH:/opt/ARM/bin" >> /home/"$(whoami)"/.bashrc

source /home/"$(whoami)"/.bashrc

arm-none-eabi-gcc --version
Step 9. Download and assemble (i.e., compile) a test application.
Execute these commands:
wget http://vlm1.uta.edu/~athitsos/courses/cse2312_spring2014/assignments/assignment7/hw07_package.zip

unzip hw07_package.zip

cd hw07_package

make
You should look at the files extracted from hw07_package.zip, as it contains a sample makefile (filename: Makefile), a sample ARM assembly program (filename: hw07.s), and some other necessary files for specifying where in memory the program will be located.
Step 10. Execute QEMU on the test application.
Execute this command:
qemu-system-arm -s -M versatilepb -daemonize -m 128M -d in_asm,cpu,exec -kernel hw07.binThis should open a QEMU console window. Once started, press ctrl+alt+3 to change to QEMU's UART (serial) display output, it should be printing 0 through 7 repeatedly.
The following is an example screenshot of what you should submit for this task. Note that the name is visible on the upper right and the QEMU output window is displaying the sample application's output (printing 0 through 7 repeatedly).
Back to the list of assignments.